I got my attic converted in Dublin. It was one of the best decisions I've made for the house - and one of the most stressful projects I've been through. This is the full story.
I wrote this site because I went into the conversion knowing almost nothing, learned everything the hard way, and came out the other side thinking: someone should write all this down. So I did. Every guide on this site links back to something I experienced firsthand. This piece ties it all together - the full timeline, the decisions, the mistakes, and what I'd do differently.
The decision to convert
The attic was sitting there, wasted - full of Christmas decorations and suitcases. I wanted to add value to the house, make maximum use of the space, and have the option of renting a room out in the future if it ever made sense. A typical Dublin semi-d with an unused attic felt like a missed opportunity.
I was the first of my neighbours to get it done, so I didn't have much of a reference point. I spent a lot of time on social media, websites, and ChatGPT trying to piece it all together. Everything was new - I didn't know what questions to ask, let alone what the answers should be. After I got it done, the neighbours were grateful for what I'd learned, so I figured I'd make this site to help others going through the same process. Completely honest, completely upfront.
What I didn't realise at the time was how many decisions there would be, and how many of them I'd never heard of before. Waste pipe routing? Spray foam vs rigid board? U-values? Certificates of compliance? I had to learn all of it on the fly.
Getting quotes and choosing a builder
I looked into 3-4 companies and got 2 proper quotes. The quotes varied not just in price but in what was included. Some included Velux blinds, some didn't. Some included a certificate of compliance, most didn't. Some were vague on insulation type.
At the time, I simply wasn't informed enough to spot a couple of red flags with the person I went with. Thankfully, everything is fine now - the conversion is done and I'm happy with it - but it could have been smoother. I've written a full guide on how to choose a contractor with every question I wish I'd asked.
What I'd do differently
Compare what's included, not just the price. Ask about certificates, insulation type, and aftercare upfront. And agree a sensible payment schedule - 30% deposit, 40% midway, 30% on completion. Never pay everything upfront.
The build - what actually happens
A standard attic conversion takes roughly 2-3 weeks of active work. Here's roughly how mine went:
Week 1: Structure
The roof comes off (partially), steel beams go in, floor joists are strengthened, and the staircase opening is cut. This is the heavy, noisy, structural phase. Steel RSJs are manoeuvred into position and bolted in place. The new floor is laid with OSB.
Week 1-2: Insulation & first fix
Insulation goes between (or over) the rafters. I went with spray foam - which I now have mixed feelings about. See my insulation guide for the full picture. Electrical first-fix happens: cables are run, back boxes installed, everything positioned before the plasterboard goes up.
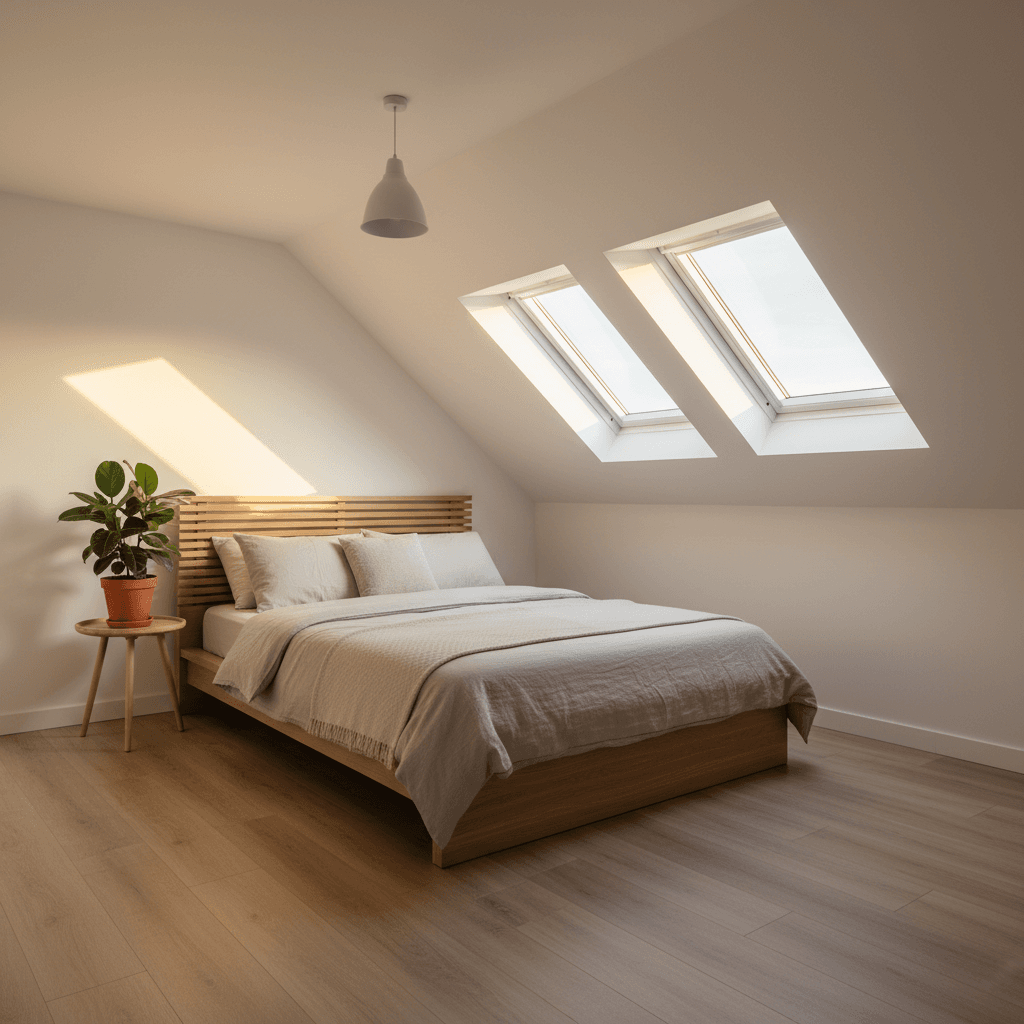
Read the full guide →Week 2: Plasterboard & Velux windows
Plasterboard goes up on walls and ceiling. Velux windows are installed in the rear roof slope. The room starts to take shape. This is when you see the space for the first time and it feels real.
Read the full guide →Week 2-3: Plumbing & second fix
The ensuite plumbing goes in - including the waste pipe, which turned out to be the most stressful part of the whole build. Hot and cold water supply for the kitchenette. Electrics second-fix: sockets, switches, and lights are fitted. The stairs are built and finished.
Read the full guide →Week 3+: Finishing
Plastering, painting, flooring, kitchenette installation, snagging. The builder wraps up and hands over. In theory. In practice, snagging can drag on if you’re not on top of it.
The key decisions along the way
Every attic conversion involves a series of decisions that nobody prepares you for. Here are the ones I faced, what I chose, and how it worked out:
Insulation: spray foam
It works well thermally. But I now know about the UK mortgage issues with spray foam and wish I’d been better informed. I’d probably choose rigid board if doing it again.
Read the full guide →1 radiator, wet system
One radiator was the right call. The attic is well insulated and one radiator handles it fine. Going wet (connected to existing boiler) kept running costs low.
Read the full guide →LVT flooring with foam underlay
Looks great, waterproof (important with a kitchenette), and the noise from below has been zero issue. Finding an LVT fitter was harder than expected though.
Read the full guide →Electric Velux blinds
One of the best decisions of the whole build. One button to close all blinds at night. Genuinely life-changing compared to reaching up to a skylight manually.
Read the full guide →Kitchenette with units from a local manufacturer
Designed in the IKEA planner, built locally. Fair prices, good quality. The kitchenette makes the attic genuinely self-contained.
Read the full guide →Socket positions planned around furniture
Bedside sockets a bed-width from the corner. TV socket high on the wall. Storage area sockets for all the tech. Every one of these was right. Planning electrics before plastering is essential.
Read the full guide →The snags and problems
Not everything went smoothly. These are the issues I dealt with, in order of how much stress they caused:
The waste pipe revelation
I didn’t know that a toilet in the attic needs a large-bore waste pipe running down to the soil stack outside. The routing, the fall, the proximity to the existing stack - this was completely new to me and caused real anxiety during the build.
Read the full guide →Two leaks after completion
Two separate leaks appeared in the months after the build was finished. Both were plumbing-related. Getting the builder back to fix them was harder than it should have been. Aftercare was poor.
Noisy water tank pump
The water tank was moved to the storage area above a bedroom. The cheap submersible pump was loud every time it refilled. I tried rubber matting and insulation - helped a bit. In hindsight, it would have been a good time to replace the pump when the tank was being moved - full access, everything open, easy job. Instead I did it after the build at extra cost.
Read the full guide →Certificate of compliance delays
The builder was slow to arrange the engineering cert. Required multiple follow-ups. I eventually lost confidence and arranged a third-party engineer independently. Should have done this from the start.
Read the full guide →Poor aftercare generally
Getting callbacks for snagging issues was difficult. The builder was responsive during the build but much less so afterwards. A written aftercare agreement would have helped.
Read the full guide →The things that went right
For all the problems, the overall result is genuinely great. The build quality of the room itself is good. Here's what worked:
Overall build quality - the structural work, plasterboard, and finishing are solid
Certificate of compliance from an independent third party - gives me real confidence in the structure
One radiator was exactly the right call - the room heats up quickly and stays warm
LVT flooring looks great and the soundproofing has been a non-issue
The kitchenette transforms the space - it’s genuinely self-contained
Kitchen units from a local manufacturer - great value, good quality
Electric Velux blinds - one of the best decisions of the whole project
The storage areas behind the knee walls are incredibly useful - more storage than before the conversion
The storage area works perfectly as a hidden “server room” for router, NAS, CCTV, and other tech
Solar battery and inverter fit neatly in the storage area
Socket planning paid off - every socket is in the right place
The costs - a realistic breakdown
I've written a full cost guide with detailed numbers. But here's the high-level summary of what the whole thing actually cost, including the extras that nobody warns you about:
€22k-€28k
Builder quote range
+ extras
Blinds, cert, flooring, appliances
€30k+
Realistic total all-in
The builder quote is never the full picture. Add Velux blinds (€200-400 per window), engineering certificate (~€750), flooring (€625-1,250), kitchenette units and appliances (€2,000-4,000), and any extras that come up during the build. The "starting from €19,000" you see on contractor websites is not what you'll actually spend.
Read the full cost breakdown →
Six months later - how it actually lives
The attic is in use every single day. It's genuinely probably my favourite space in the house. The light from the Velux windows is genuinely beautiful. The kitchenette means I don't need to go downstairs for a cup of tea. The ensuite works perfectly (once the plumbing issues were fixed). The storage areas hold more than the entire attic did before the conversion.
Was it worth it? Absolutely. Without question. The house feels bigger, the space is used every day, and the value it adds (both in daily quality of life and in house value) far outweighs the cost and stress.
Would I do anything differently? Yes. I'd ask harder questions upfront. I'd arrange my own independent engineer from day one. I'd choose rigid board insulation. I'd get the aftercare agreement in writing. And I'd think more carefully about where the water tank ended up.
But would I do it again? In a heartbeat.
Explore all the guides
Every guide on this site comes from something I experienced during my own conversion. Each one is written to give you the information I wish I'd had before I started.
What Does It Actually Cost?
Where Should Your Ensuite Go?
Spray Foam vs Kingspan
Planning Permission: Do You Need It?
Certificates & Compliance
1 Radiator or 2?
Velux Windows & Blinds
WiFi, Ethernet & Smart Home
Adding a Kitchenette
Flooring & Soundproofing
BER Ratings & Your Conversion
Electrics & Sockets
The Water Tank Problem
How to Choose a Contractor
I wrote all this so you don't have to learn it the hard way
Start with the free planning tool and get a personalised report for your conversion. It covers costs, insulation, certificates, builder questions, and everything else. It takes 2 minutes.
Try the Planning Tool